Getting started
This repository comes with a dev container, we recommend using the container since it allows for a fast setup. Refer to - Running tests locally for a detailed guide on the recommended way of running the tests locally.
For writing new tests, please refer to how-to-write-a-new-test
Setting up the development environment
We recommend using python 3.10 or later versions of Python.
Required steps:
Clone the repository
Initialise the submodule (inventory) with
git submodule initPull submodule changes with
git submodule update
This project uses a private library testframework which is packaged and uploaded to an azure artifact feed within this Azure Devops Project. This requires additional authentication when installing python dependencies with pip install -r requirements.txt. Here are a few options of your development environment working.
Option 1 (recommended): VSCode and DevContainer
Prerequisities
Docker
VS Code
This option is recommended as it sets up your environment for you, including authentication against the artifact feed.
Install the Remote - Containers extension in VS Code.
Open the project folder in VS Code.
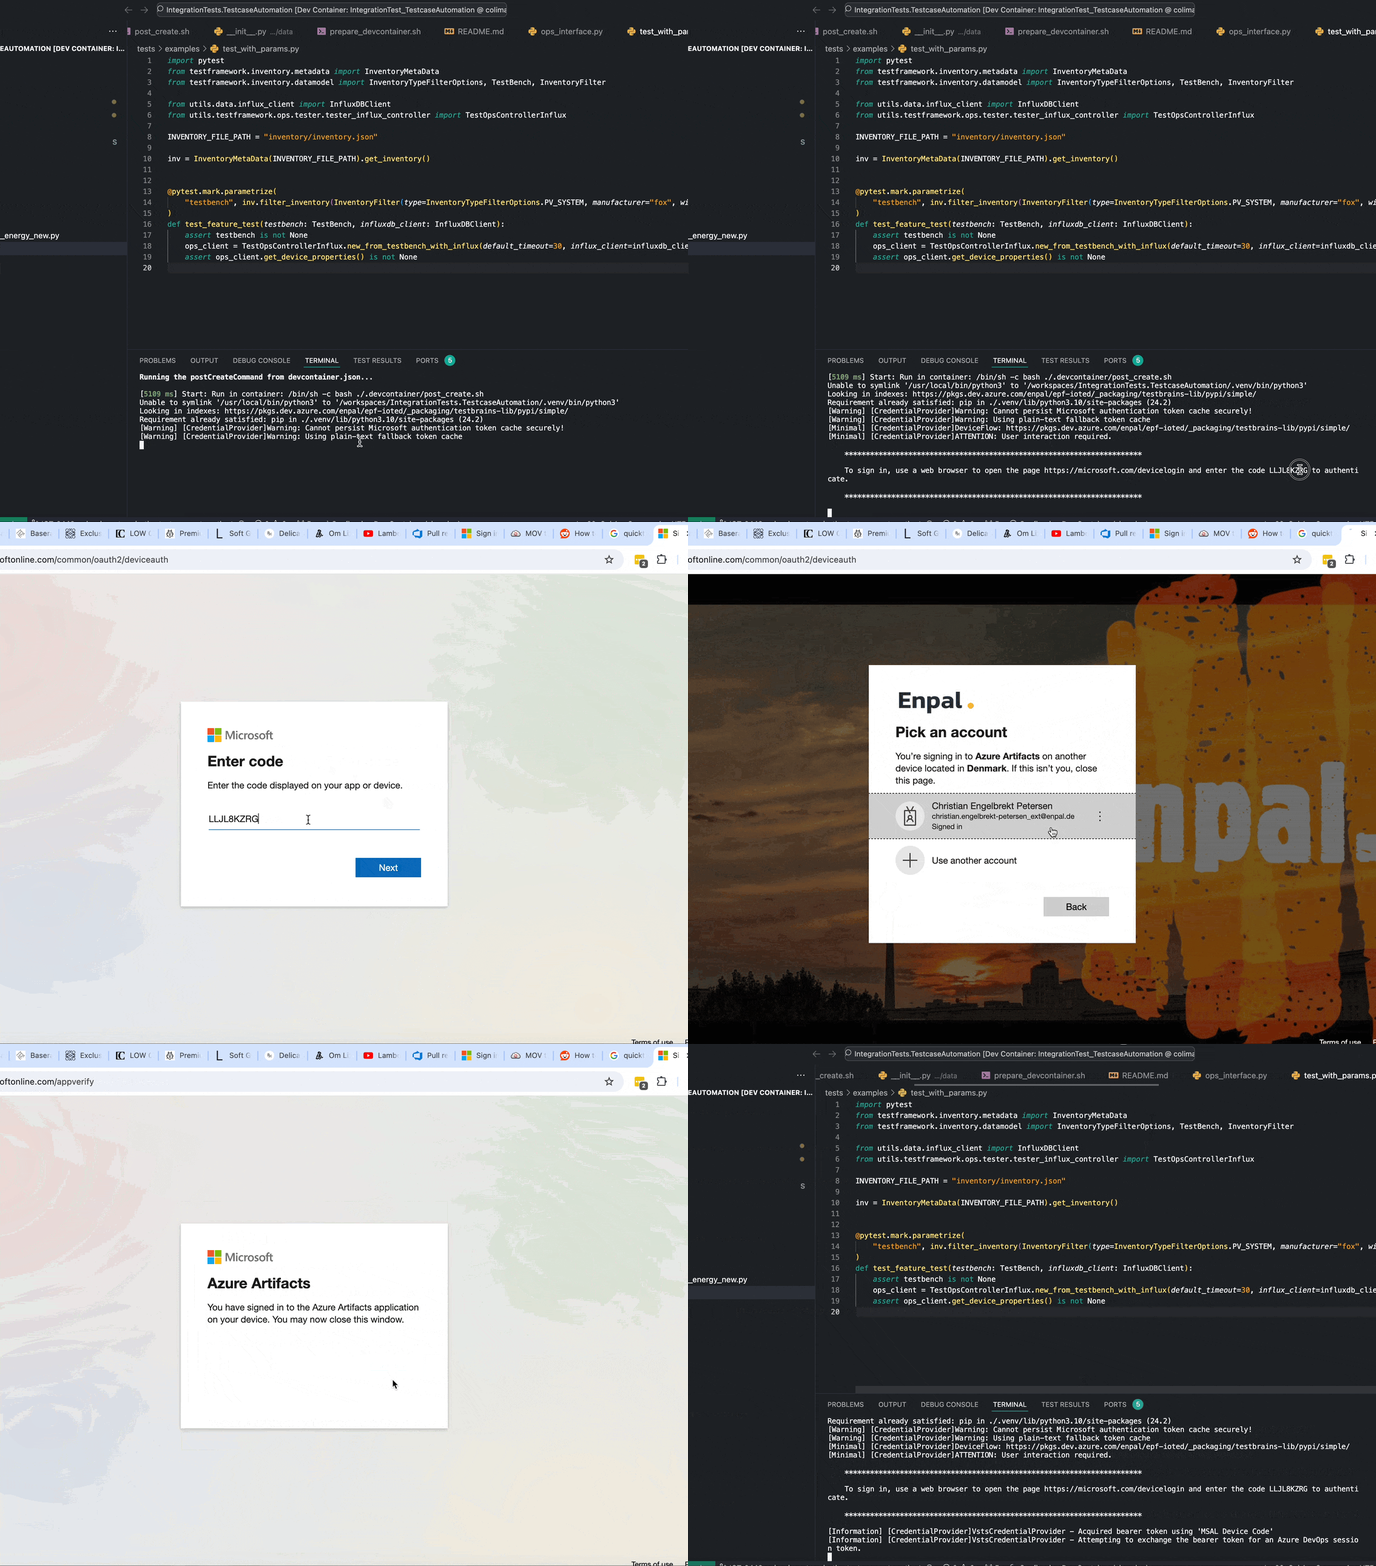
Click on the button in the lower-left corner of the VS Code window and select “Remote-Containers: Reopen in Container”.
When prompted, sign in with the device code to your azure account.
Note This will add a PAT token to your azure devops account with an expiration in 30 days, meaning that you will have to re-authenticate at minimum within 30 days.
At this point you should be good to go, if not try option 2 or reach out to us 🧟

Option 2: Virtual Env
After cloning the repository and submodule. Follow these steps.
Create a virual environment `python -m venv .venv”
Activate the environment in your terminal with
source .venv/bin/activateMake your editor use this python interpreter when prompted.
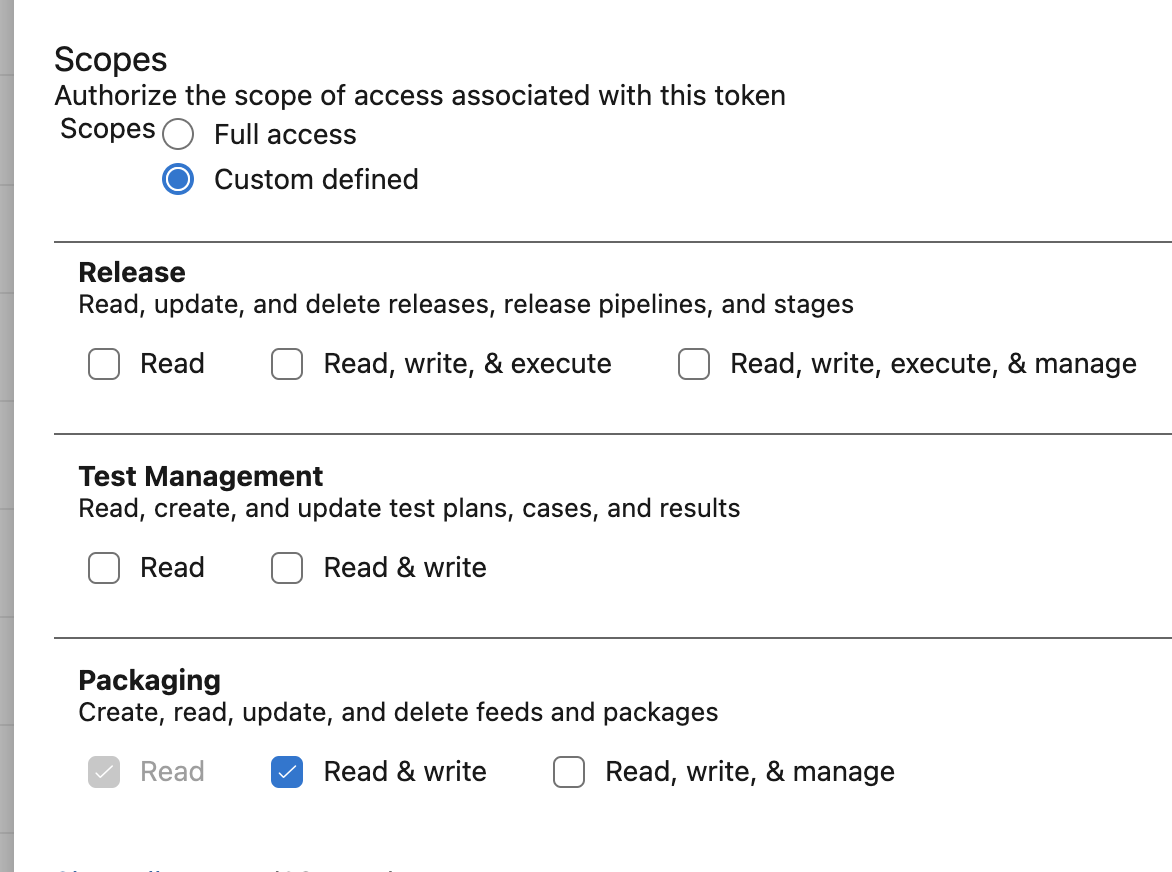
Create a PAT in azure devops and as a minimum grant the scopes:
Packaging: Read & Write.
Create the file
.venv/pip.confif you’re on a Unix based OS, else create.venv/pip.iniwith the following contents:
[global]
extra-index-url=https://<YOUR_PAT>@pkgs.dev.azure.com/enpal/epf-ioted/_packaging/testbrains-lib/pypi/simple/
Run
pip install -r requirements.txtand you should be all set.
IMPORTANT if at this stage it doesn’t work, try replacing
extra-index-url=https://<YOUR_PAT>@pkgs.dev.azure.com/enpal/epf-ioted/_packaging/testbrains-lib/pypi/simple/with
extra-index-url=https://<YOUR_PAT>@pkgs.dev.azure.com/enpal/epf-ioted/_packaging/testbrains-lib%40Local/pypi/simple/instead,
Running tests locally
You can run tests locally whenever you’re connected to the IoT-VPN.
Either you can run tests from the CLI or you can run tests via the test explorer
From the test explorer
This repository enables anyone to run tests against specific test benches or multiple testbenches. To do so in the testexplorer follow these steps
Make sure to be on connected to the Azure VPN,
Either set the the environment variable
TESTBENCH_TARGETto the testbench to be selected, or edit the default config file config. Local config file has priority, if nothing is specified, GULASCHSCHARF is the set default value.
note some tests using the new inventory feature do not require the environment variable
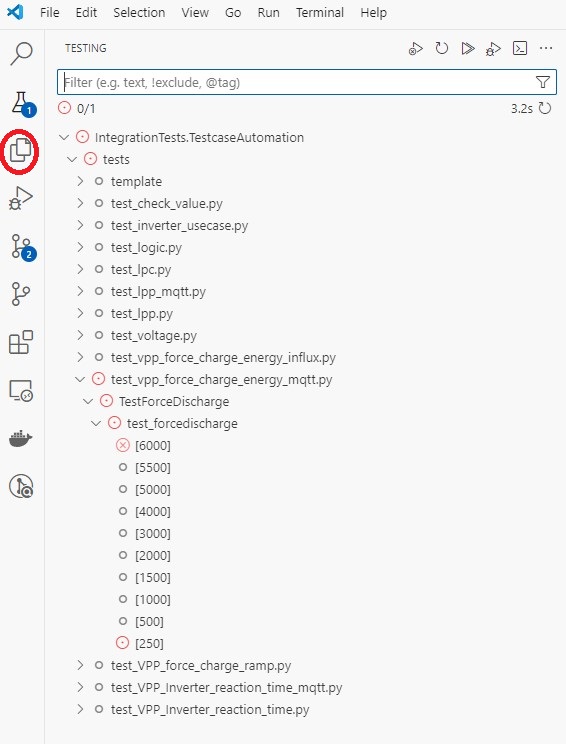
In VS code open the testing tab and run the test case you want

Running from CLI
To run the tests run the following command in the root
pytest --tb=auto -l -v -s
For evaluating code coverage run
coverage run -m pytest
and check report with
coverage report
How to write a new test?
You will know best about the features that you are testing, but some general recommended guidelines can be found here.
To write a new test, follow these general steps:
Create a new Python file under the
testsdirectory. In the correct domain.Import the necessary modules and test fixtures. Read more about available fixtures here
Define your test function using a class and a test function for each test.
Add test cases using the
assertstatement to verify expected behavior.Run the test using cli or the test explorer.
Important Please use a fixture when available, they provide optimizations and teardown features when used.
Methods of selecting test benches
We currently support one approache when it comes to selecting your testbench for tests.
Using the inventory
We’d like to enable test users to write automated tests against a list of testbenches given a set of filter critiera. We’ve solved this using a centralized inventory which is mounted into this repository as a submodule. On top of this we’re expose the testframework.inventory library which enables you to load this inventory and call some filters on it.
Take a look at this example from tests/examples/test_with_params.py
# any bench that fulfills the filter critiera
# In this case "    get_inventory().filter_inventory(InventoryFilter(type=TestBenchType.PVSYSTEM, with_testbrain=True, manufacturer=ManufacturerOptions.Huawei)) "
# will return an array of testbenches that are PVSYSTEMs containing a testbrain and is manufactured by Huawei
@pytest.mark.parametrize(
    "testbench",
    get_inventory().filter_inventory(InventoryFilter(type=TestBenchType.PVSYSTEM, with_testbrain=True, manufacturer=ManufacturerOptions.Huawei)),
    ids=get_testbench_id,
)
def test_example_filter_on_inventory(testbench: TestBench):
    assert testbench is not None
    assert testbench.testBrain is not None
    # from the given testbench we can create a ops client and brain client
    ops_client = OpsClient(default_timeout=30, tb=testbench)
    test_client = TestClient(default_timeout=5, tb=testbench)
    assert test_client.get_available_contactors() is not None
    assert ops_client.get_device_properties() is not None


# Filter for specific bench, (will resolve bench 13) if you want multiple specific benches you can specify them like so:
# TBS = [
#     get_inventory().filter_inventory(InventoryFilter(id="TESTBENCH_13")),
#     get_inventory().filter_inventory(InventoryFilter(id="TESTBENCH_14")),
# ]
# and you can pass it as a parameter
# @pytest.mark.parametrize("testbench", TBS, ids=get_testbench_id)
@pytest.mark.parametrize(
    "testbench",
    get_inventory().filter_inventory(InventoryFilter(id="TESTBENCH_13")),
    ids=get_testbench_id,
)
def test_example_filter_specific_testbench(testbench: TestBench):
    assert testbench is not None
    ops_client = OpsClient(default_timeout=5, tb=testbench)
    assert ops_client.get_device_properties() is not None```

In this example we're loading the inventory object with `InventoryMetaData.get_inventory()` and filtering objects based on the filter object
```python
# We want a PV system, with a testbrain manufactured by fox
InventoryFilter(type=TestBenchType.PV_SYSTEM, manufacturer=ManufacturerOptions.Huawei, with_testbrain=True)
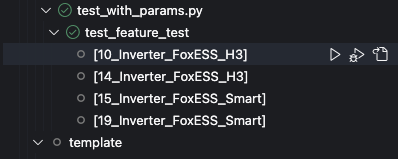
From here, we can write our tests as we usually would. Bear in mind that are potentially running against multiple testbenches and make sure nobody else is using them. In VSCODE you can get an overview of which these are in the test explorer…

This updates live as you change the InventoryFilter object. You can at any time run just the single test against one of these by pressing the “play” button next to the title of the testbench
Using Environment Variables
Instead of using the filter directly you can also use it via environment variables. The primary use for this, is to create one pipeline that can resolve to different Testbenches and different test suites using pytest markers. If this applies to you, check out the corresponding documentation
# tests/examples/test_running_from.pipeline.py
import pytest
from testframework.inventory.datamodel import InventoryFilter, TestBench
from utils.helper import get_inventory

inventory = get_inventory()
filter_from_env = InventoryFilter.from_env()

testbenches = inventory.filter_inventory()
# dynamically resolving testbenches from environment variable, when testing locally this is set in config/.env_vars
# when running from pipeline, set via parameters instead
@pytest.mark.YOUR_MARKER_HERE
@pytest.mark.parametrize("testbench", testbenches)
def test_from_env_bench(testbench: TestBench):
  # test logic
  #...
Notice we’re using InventoryFilter.from_env() instead of definign an InventoryFilter directly. You can dynamically modify these while testing by modifying the file at:
configs/env_vars
which should look something like this:
# PLEASE READ
# .env_vars file can be modified for testing dynamic resolving of testbenches from envvars
# please be mindful of the allowed values:
# WITH_TESTBRAIN: ("true", "false", "any" or leave blank)
# TYPE: ("PVSYSTEM", "WALLBOX", "any" or leave blank)
# MANUFACTURER: ("Sungrow", "Huawei", "StarCharge, "FoxESS","Huawei", "any" or leave blank)
# ID: (TESTBENCH_XX), where XX is a testbench in inventory) i.e "TESTBENCH_13". Can be multiple, seperated by comma ("TESTBENCH_13,TESTBENCH_14")

# default: change as you need, in pipeline this is ignored and the pipeline parameters are used instead
TESTBENCH_WITH_TESTBRAIN = "any"
TESTBENCH_TYPE = "any"
TESTBENCH_MANUFACTURER = "any"
TESTBENCH_ID = "TESTBENCH_15"
TestCases and Domains
This repository is a central repository for writing automated tests against the real hardware. It will therefore have multiple contributors, and therefore we have chosen to split the tests into the following domains
Integration & Abstraction (
tests/domains/integration_abstraction)VPP & HEMS (
tests/domains/vpp_hems)Charging (
tests/domains/charging)
Running tests via the pipeline
The tests in this repository can be executed on the bench hardware via the pipeline found here.
The bench to target as well as a pytest marker selection query defining tests to include can be specified via the pipeline run dialog.
Creating your own custom pipeline
Please see the seperate documentation for this here
Scheduled test execution
The automated test-pipeline for this repository is executed nightly against test-bench 15, ‘Gulasch Scharf’
To include a test in nightly runs it has to be tagged with the following pytest marker @pytest.mark.scheduled_pipeline.
Running test subsets
For some tests there is a large number of parametrized cases specified. For long running tests it might be desireable to limit the number of cases executed under certain conditions, such as when running in the pipeline.
This can be achieved using the full and subset pytest markers:
Tests marked as
subsetwill be skipped by default when running via the cli.Tests marked as
fullwill always be executed, unless pytest is run via the cli with the option--run-subsetspecified, in which case tests marked asfullare skipped and tests marked assubsetare executed.This allows developers to create an additional variation of each tests with a limited number of cases.
Note that the pipeline executes tests with the option --run-all, which will ignore both the subset and full markers. Instead developers may chose which version of the test they want to run in the pipeline by only including the scheduled_pipeline marker in either the full or subset version of their test.
You can use these arguements to settings.json in .vscode/, for example if I want to run the subset tests:
"python.testing.pytestArgs": [
    "tests",
    "--run-subset"
],